SURVEY THE SITE
There are many types of surveys, but the most relevant ones to us permaculturists are topographical surveys that identify levels and locate land features. In this implementation guide, we’ll focus on identifying the most critical item in permaculture water-management systems – the contours.
When you need to survey your site and mark contour lines you have both high-tech and low-tech options at your disposal. Which one you’ll use depends upon your expertise, your budget and the size of the project.
The high-tech option, the laser level, is highly accurate, but it’s not cheap to buy and it requires some technical skill. However, when you need to do a big job and quickly mark out a large area just by yourself or when you’re working with an earth-moving machine this is the preferred option. If you can’t buy it consider hiring it for the duration of the job.
The low-tech option, an A-frame, is a simple, yet also effective, tool for the job. It won’t cost you much, you can build it yourself from almost any wood you have lying around, and it can be quite accurate if used correctly.
You probably won’t be using an A-frame while you’re working with an earth-moving machine, but for marking your contours on the cheap it’s a perfect tool for smaller projects. It does, however, necessitate a little more time to do the job.
Constructing and Using an A-frame
An A-frame is just three pieces of wood nailed together in the shape of a capital letter A and a length of string with a weight to hold the string down. Anyone can build an A-frame in one afternoon for less than $20, all you need is a few basic tools, materials and some free time.
What you’ll need? low-tech/low-cost option
Construction materials:
- Three pieces of lumber
- A tape measure
- Some screws
- Some string and a large screw or something similar to act as a “plumb bob” OR a small plastic carpenter’s level
- Tools: hand saw, drill and bits, screwdriver
Survey accessories:
- Survey flags or wooden stakes
How to make a simple A-frame
Estimated time: 1 h
- First, decide on your A-frame height and spread between the legs. Try to make the legs long enough so once you have your A-frame the open end of the A (your base) is a desirable length, 1 m or 2 m (3-6 feet). This will help you to keep track of the distance once you’re on the site marking your contours.
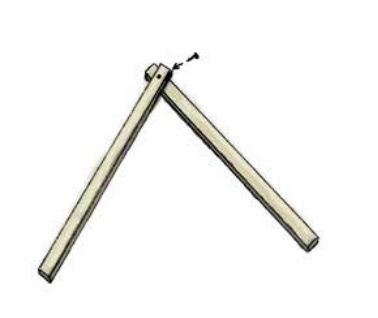
- Measure and cut the legs (aim to make them the same length) and then join these two long pieces of lumber at the one end with your drill and a screw.
- Following this, place a shorter piece of lumber (crossbar) perpendicular across the legs and making sure the legs are spread to the distance you decided upon earlier, screw it to the legs.
- Drill a small screw where the two legs meet and tie one end of your string to this screw.
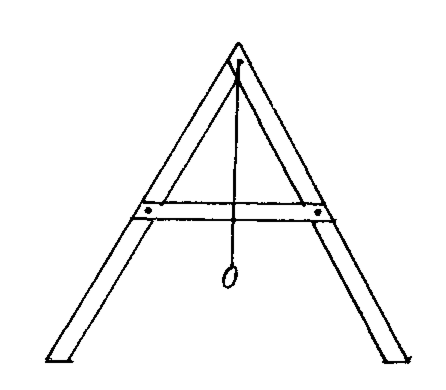
- Tie the weight (large screw or something) as a “plumb bob” to the other end of the string. This plumb-line now becomes your measuring device for finding your land’s contours. But before that…
So you now have your A-frame with a string and hanging plumb bob down the center. Now, there is one more step before you start using your A-frame, you need to calibrate it.
- Stand your A-frame and make a mark where string rests on the crossbar.
- Reverse the legs and mark on the crossbar again.
- The spot in the middle of these two marks is your true level mark you will be using when searching for your contours.
Note: You can make an A-frame with a carpenter’s level instead of the plumb-bob. One of the annoying things when using an A-frame with a plumb-bob is that the plumb line swings like a pendulum and sometimes takes a while to settle, especially in windy weather.
Using a carpenter’s level and attaching it on the crossbar speeds up the process of finding contours, but then the A-frame needs to be much more precisely built. The legs have to be dead-even, the crossbar dead-level, and positioned correctly. If you have the tools and skill, I would suggest making one of these so you can be quicker in marking your contours on the site.
How to use an A-frame to find contours
Start at one end of your property, and mark your starting point with a stake, survey peg or flag.
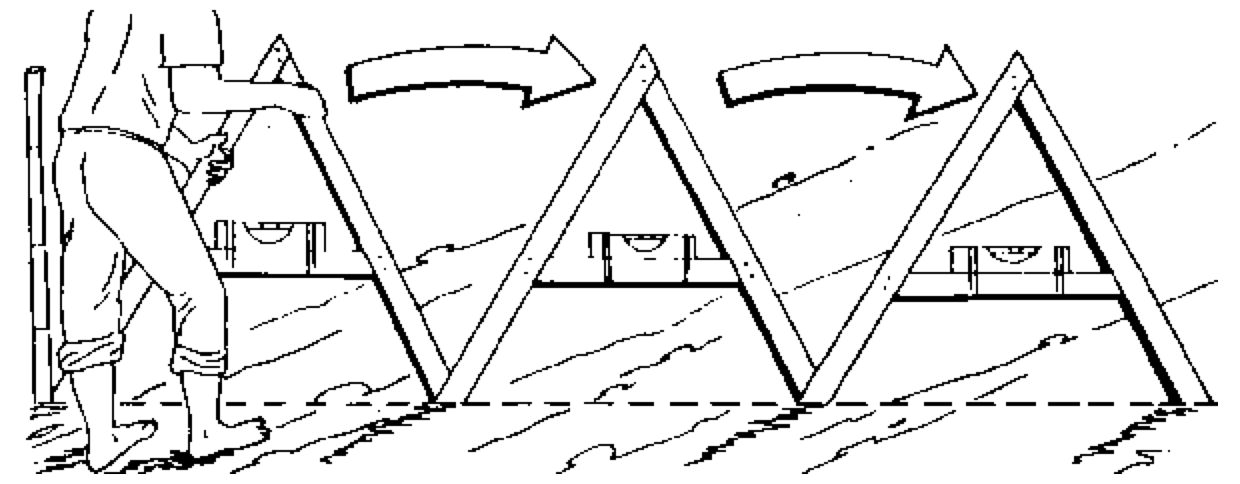
Put one leg of your A-frame on your starting point and move the other leg up and down the slope until you get a level reading with the plumb-line (or carpenter’s level). This is your second point, mark it with a stake.
Now move the A-frame forward by keeping the front leg (that’s on the second point) in place and pivoting the rear leg forward, adjusting it again until there is a level reading. Mark that spot again.
Keep repeating this process, continue pivoting and marking until the whole contour line is laid out.
Note: Once you’re done, if necessary, you can even out the small irregularities in your contour line caused by the small terrain changes. Simply adjust or move any stakes that are abruptly out of line to even out your contour.
Using a Laser Level
A laser level is the most advanced type of level available today. It is an extremely versatile leveling device and by far the fastest and most accurate method of finding contours. Plus, it requires only one person to operate.
It consists of a tripod with a laser beam projector on top which projects a laser light, and a receiver; a long retractable measuring stick with an electronic reader on it which picks up the laser light coming from the tripod.
Once it’s set up, you move across your terrain, detect the laser beam with the receiver and mark the contour lines.
What you’ll need? high-tech/high-cost option
- Rotary level laser
- Survey flags or wooden stakes
How to use a laser level to find contours
- You’ll want to put the laser level uphill of where you want to mark a contour line so it’s not in your way as you go about searching for the contours.
- Also make sure that you’re not too far from the laser as it has a limited range, and avoid any obstructions that might interfere with the signal.
- Attach the laser level projector on the tripod, screw it lightly to the platform and position on the desired spot.
- Make the tripod relatively level and step in the posts into the ground so it doesn’t move.
- Level the laser level, depending on the type it might self-level or you’ll need to do it manually. If you need to do it manually look at the spirit levels on the sides of the laser level projector and fine-tune until level. Tighten the screw so the projector binds to the platform.
- Turn the laser level on – now you have a horizontal line established in space.
- Go to the point where you want your contour line outlined, this will be the benchmark elevation, the contour you’ll be working with.
- Attach the laser detector (receiver) to a measuring stick and place the stick at this point. Hold the stick upright vertically while adjusting the receiver up and down. When you hear beeping, you have found the level, tighten the receiver to the stick.
- The bottom of the stick is now your desired ground height and the receiver will make an audible signal indicating when you’re dead on the contour line of equal elevation.
- Mark this reference spot with the survey flag or the wooden stake.
-
Hold the stick and walk out another 5 feet or so in the direction where you want to outline the contour line.
-
Turn the stick towards the laser and wait until there is a solid line of sound or other indication that you’re dead on the contour.
-
Mark the spot again.
ADDITIONAL RESOURCES:
- The Permaculture Earthworks Handbook: How to Design and Build Swales, Dams, Ponds, and other Water Harvesting Systems
- Rainwater Harvesting for Drylands and Beyond (Vol. 2): Water-Harvesting Earthworks
- Edible Landscaping with a Permaculture Twist: How to Have Your Yard and Eat It Too
- Gaia’s Garden: A Guide to Home-Scale Permaculture, 2nd Edition
Videos:
Copyright © 2023 Permaculture Apprentice. All Rights Reserved | Privacy | Terms of Service |Member Agreement
0 Comments