TEST THE SOIL (EARTHWORKS)


Prior to performing any water-harvesting earthworks, you should test your soil’s physical characteristics at the proposed sites of your ponds or dams, swales, drains…

The purpose of these tests is to measure the quality of your soil from a water-management perspective so you know what to expect, the suitability of the sites in question and how to size and design the water-management features.

You can do all of the tests with no special training and no special tools; the only real requirement is time and willingness to dig test holes.

The entire soil testing protocol consists of conducting four simple tests at the desired spot,  looking at the 1. soil’s compaction, 2. profile, 3. texture and 4. drainage.

Note: when selecting a place to conduct your test, choose a spot that is representative of the site, i.e. the soil you’d find there would be the soil you’d find across the whole proposed site. In case of differences in soil type across the proposed site, choose multiple representative spots.

How to Test Your Soil 


What you’ll need?

Estimated cost: 0$ – $30

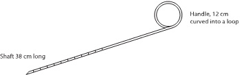
  • A 50 cm (20 in) length of 3.15 mm (10 gauge) high-tensile wire.
  • A bucket of water
  • A shovel
  • A timer

[PRINT OUT THE CHECKLIST]

Test 1: soil compaction 


Estimated time: 10 min.

Once you’ve decided where you want to test your soil, you can do the first test and see how compacted your soil is. This test will reveal how hard it’s going to be to dig the soil and what kind of runoff/infiltration into the soil you can expect.

To test the compaction of the soil you’ll need a DIY penetrometer. You could buy sophisticated penetrometers, albeit for hundreds of dollars, but you can also make your own inexpensive version.

STEP 1: Make the DIY penetrometer

  • Take the wire and use 12 cm ( 5 inch) of the length to make a handle, on the remaining 25 cm (10 inch) make file marks every 2.5 cm (inch) from the end.

STEP 2: Use the metal rod to test the compactness of your soil

  • Using ONLY moderate pressure push your DIY penetrometer into the soil. In case you hit a rock or tree root, choose another spot nearby.

STEP 3: Note the results depending on how far the rod has gone into the soil

  • If the wire probe did not penetrate at all you have a very compacted soil.
  • If it penetrates with difficulty to less than 20 cm the soil is moderately compacted.
  • If the wire probe penetrates to 20cm or more, the soil is not compacted.

In heavy, compacted soils you’ll have a hard time digging by hand in any season, also the infiltration rate will be low and you can expect more runoff.

Non-compacted soils will absorb water more readily and will be much easier to work with.

Test 2: soil profile 


Estimated time: 20 min.

Once you’ve tested the compactness of the soil, it’s time to dig a test hole at the same spot. You’ll use this soil pit for the remaining three soil tests.

First, you’ll want to check your soil profile – identify layers or horizons of the soil. Performing this test will reveal the depth of your topsoil, subsoil and, depending on how deep you can dig, the depth of the underlying weathered rock or bedrock.

This is important information from a water-management perspective as the depth and thickness of these layers will determine what you’ll be to do.

The soil layers compromising the soil profile will be approximately parallel to the ground surface. You’ll be able to distinguish each layer from the one above or below as they’ll be different in in one or more characteristics, namely color, texture, structure, consistence.

Note: If you’re testing your soil for a pond site, depending on its desired depth, you’ll probably need to dig a much deeper test hole than the one outlined here.

STEP 1: Dig a hole

  • Grab a shovel and dig a hole at least 12” ( 30 cm) in diameter by 12” – 18 “ (30 – 45 cm) deep, with straight sides. Preferably dig wider and deeper than that (ideally 20″ by 20″ /50 cm by 50cm), the bigger the hole the better you’ll understand your soil profile.

STEP 2: Observe the soil profile

Starting from top, observe the soil profile to determine the length and the differences between soil layers. Look at different colours, shapes, roots, the size and amount of stones…

Most soils exhibit 3 main layers/horizons:

  • Humus-rich topsoil (A horizon)  where nutrient, organic matter and biological activity are highest. The A horizon is usually darker than other horizons because of the organic materials.
  • Subsoil (B horizon) mostly made of clay, iron minerals as well as organic matter, which has been washed down to this horizon by rainwater. It generally has a lighter colour and less biological activity than the A horizon. Texture may be heavier than the A horizon too.
  • Underlying weathered rock (C horizon) the parent material from which the upper soil layers developed.
  • Additionally some soils also have an O horizon mainly consisting of plant litter which has accumulated on the soil surface.


STEP 3: Note the results

  • if you were able to dig deep and you can clearly observe all three layers, that’s very good, make a note of the thickness of each, in the next test you’ll determine what’s the subsoil comprised of and how suitable it is for the water harvesting earthworks
  • if you were able to dig through the topsoil (A horizon) and into the subsoil (B horizon) and then were forced to stop, that’s fairly good, you’ll determine what’s the subsoil comprised of in the next test
  • if you have no subsoil and you hit bedrock that’s bad,  your water harvesting capabilities are limited.

Test 3: soil texture 


Estimated time: 10 min.

Now when the soil profile is exposed you’ll want to evaluate soil texture; the proportion of sand, silt, and clay in your soil. The texture influences the rate at which water enters and moves through soil, which is of primary concern as we are building water harvesting earth structures.

Understanding soil texture will help you in deciding whether you can build a compacted pond without a liner, how wide and deep should the swales be and how well the harvesting drains will work.

The three building blocks of soil sand, silt, and clay give different properties to a soil for a water management perspective. Clay is slow draining, Sand is quick draining but has trouble retaining moisture, Loam is generally considered to be ideal soil because it retains moisture but doesn’t stay soggy.

Also these soil particles feel very different in hand, Sand feels gritty, dry silt feels like flour, when wet smooth, Clay will feel sticky when wet and hard and brittle when dry. In this simple test we’ll take advantage of that fact and estimate the soil texture by feel.

STEP 1: Take a handful of soil

  • Take a handful of soil from the sub-soil layer of your test soil pit, if the soil isn’t moist already slowly add water a drop at a time

STEP 2: Give it a gently squeeze, then, open your hand.


Does the soil remain in a ball when squeezed?

    • If no, then the soil is a SAND
    • If yes, does the soil form a ribbon?

STEP 3: Squeeze it into a ribbon

Place the ball of soil between your thumb and forefinger, gently push the soil with your thumb, squeezing it upward into a ribbon. Allow the ribbon to emerge and extend over your forefinger, until it breaks from its own weight. How long is the ribbon before it breaks?

If no ribbon forms, then the soil is a LOAMY SAND.

If yes, does the soil make a . . .

  1. weak ribbon – less than 1” (2.5 cm) long before it breaks
  2. medium ribbon – 1-2” (2.5 – 5 cm) long before it breaks
  3. strong ribbon – over 2” (5 cm)  long before it breaks

STEP 4: Determine the gritiness

Rub the soil between your fingers to determine if it feels gritty, smooth, or equally gritty and smooth.

1. Weak Ribbon.

  • Very gritty . . . then you have a SANDY LOAM.
  • Very smooth . . . then you have a SILT LOAM.
  • Neither gritty or smooth . . . then you have a LOAM.

2. Medium Ribbon. 

  • Very gritty . . . then you have a SANDY CLAY LOAM.
  • Very smooth . . . then you have a SILTY CLAY LOAM.
  • Neither gritty or smooth . . . then you have a CLAY LOAM.

3. Strong Ribbon.

  • Very gritty . . . then you have a SANDY CLAY.
  • Very smooth . . . then you have a CLAY.
  • Neither gritty or smooth . . . then you have a SILTY CLAY.

STEP 5: Note the results

  • For pond constructions, it is better to have a soil with a higher proportion of clay; 30% or higher (medium and strong ribbons). Then you can be pretty confident that with proper compaction, your pond will seal.
  • For swale-building the content of clay/silt is less important but still relevant in regards to making the swales wider and shallower in case of more sandy soils or narrower and higher in case of more clayey soils.
  • For harvesting drains, the higher the proportion of clay, the better the runoff. So if there isn’t much clay consider lining the base and sides with clay, stones, bricks…

Test 4: soil drainage


Estimated time: 10 min. – 24h

Finally, while you have that soil pit dug out, you can do a simple test to check the soil drainage there. This will show you how porous the soil is and what its water-holding capacity will be, so you’ll know how your ponds, swales, and harvesting drains will behave once they are full of water.

The results of this test might vary depending if the soil is completely dry or fully saturated but you’ll want to get a general idea of soil drainage from the water-management perspective right there and then. Just bear that in mind if the current soil conditions are on one side of the extreme.

Note: if you’re specifically testing the soil to see how suitable it is for building a pond you’ll probably have to fill the hole with water twice. First to totally saturate the soil and then to do the measurements. This will give you a more accurate test reading.

STEP 1: Fill the hole with water

  • Discharge the whole bucket of water into the soil pit you dug out and let it drain.

STEP 2: Measure the drainage

  • Use a timer to determine how long the hole takes to drain completely. Unless it drains immediately in the first 10 minutes, check it every 30 minutes for the first hour after filling, then once per hour thereafter until the water has drained out.

STEP 3: Note the results

The exact results can vary but in general:

  • If the water drains out within 30 minutes of filling, the soil is excessively drained.
  • If the water drains within 30 minutes to 4 hours of filling, the soil is moderately drained.
  • If the water takes longer than 4 hours to drain, the soil is poorly drained.

Poorly drained soils are good for ponds and harvesting drains but for swales, you might want to rip or loosen the bottom to promote faster drainage.

Excessively drained soils are a no-win for any situation, you’ll have to use a liner for both ponds and harvesting drains, for swales you’ll have to add a lot of mulch, woody material and organic matter to the trench to stop the water from draining too fast.

0 Comments

Submit a Comment

Your email address will not be published. Required fields are marked *

Copyright © 2023 Permaculture Apprentice. All Rights Reserved | Privacy | Terms of Service |Member Agreement